10 Must-Know Canva Tips and Tricks 2023 (Canva Tutorial For Beginners)
Canva is a wonderful tool to start creating designs and it’s not only limited to design work. Canva allows you to create animations, videos, websites, presentations & a lot more. I was surprised by the updates that this app has received all these years.
Check out the video below,
or continue reading the blog post!
My Experience
The first time I found out about Canva was when I was 15. Currently, I am a motion artist and designer working in different design and animation software for work purposes but I found Canva to be really useful in saving time while working on designs for social media or creating youtube videos. Although if you learn Premiere Pro, that software is much better. (psss… I will teach you don’t worry) 😊
I Love Canva now and would prefer it over any other design app. Before you had to take a few different apps like photoshop, illustrator/Inkscape, After Effects, Premiere Pro, and In Design to do the project. Now, you can just use Canva alone and work on videos (Youtube Videos / End Screen Animations / Openings / Video Editing), animations (Although basic animations but still better for a starter), designs (This is the best part – Social Media Content, Thumbnails for Youtube, etc), presentations, websites & a lot more.
They even have content scheduling in-built now. With this feature, you can ditch the other scheduling applications and just use Canva. Then there is a Brand Kit tool that allows you to keep your branding consistent throughout all the designs you create – just select your brand colors, and logo, and they get used in all your designs. They also have a feature called smart mockups to bring your ideas to life by placing your design on a mockup easily.
Pricing
All this for just 50$ or 3,999 Rs (If you are Indian), only if you take up the yearly plan otherwise for monthly it’s 9.99$ or 499 Rs. Yearly is a much better value for investment when you compare it to subscribing to a different software like photoshop for removing backgrounds, and touching up then there are auto scheduling applications, all of these will make the annual cost really high.

Don’t get me wrong, these applications like illustrator, photoshop, and after effects are very useful. If you learn the software I mentioned you can create advanced animations and designs that even Canva can’t create. (psss… I will help you learn after effects as well don’t worry) 😎
10+ Tips & Tricks For Canva That you Should Know
This list is updated as of Sep 2022. As new features come out, I will update the article. Most of the tips you will find in this article will be useable with the FREE version of the Canva app. Some tips might require the PRO version. So, let’s begin with the actual tips and tricks now.
#1 Using Third-Party Image Integration Inside Canva
Third-Party Image Integrations like Pexels & Pixabay and for icons you can use Iconscout, Iconduck. These are very useful integration for both FREE & PRO users of Canva. If you are a long-time user of Canva, you know that the collection of photos in Canva is not that much.
Most of the images you find will require payment or PRO membership. If you are not ready for the PRO version and want more images or videos for your project. The best is these two integrations.
Pexels & Pixabay both got a huge variety of FREE-to-use photos and videos to be used in your project without even crediting them (You should always credit the work where needed but it’s not necessary according to these sites).
Simply set up the integration and you are good to go, start importing and have fun.
#2 Customize Vector Design Colors
Did you know that you can customize the colors of the vector files that you either made on your own and imported or used Canva’s pre-made vector files?
Yes, it’s possible. Import any vector design file in your project scene, after that you will see color boxes on the top left bar. Simply select one of these color boxes and change the colors and see the magic happen.
#3 Create GIFs Using Canva Animator
Yes, this was a surprise to me as well. When I first saw Canva, It was only a design tool. Now, they even allow creating of animations and then converting them into GIFs. They even allow you to make a full edited youtube video straight in Canva.
But for this Tip, let’s focus only on the GIFs part. So, to create a GIF in Canva.
Import a template or a vector file into the scene, next you will see the animate button on the top bar. Click it and you will find two options,
- Page Animations: These animations allow you to animate the whole page including all the elements inside with one click and have 21 options to choose from.
- Element Animations: These animations allow you to animate one single element on the page. You can individually animate each element (Free Version). Control their timings etc (only on the PRO version).
So, after you’re finished with the animation. You can play or export it. These options you can find in the top right side corner. To export click on the “Share” button then click on “Download”. Now, you can see the options for download. If you scroll down you will see the GIF export option.
Click it and you have your very first GIF exported from Canva. Enjoy!
#4 Use Canva Brand Kit To Keep Your Branding Consistent
Got A Business Brand? Need to be consistent with the colors and logo of all your designs? Canva got your back!
This is a handy feature of Canva but requires Canva PRO. Brand KIT allows you to stay with the same colors and logo whenever you create a design for social media, etc.
Currently, you can use brand colors till 3 then they require you to get the PRO version. Brand Templates, Setting up Brand Logo, Brand Fonts. These all require a PRO version of Canva.
Good News is that you can use Canva PRO for 30 days for FREE when signing up for an account. I know for FREE users this tip is of no use that’s why I included 2 bonus tips at the end of this article. Yippe!
#5 Use Canva Shortcuts To Save Time
There are many shortcuts in the Canva app and Using these shortcuts will save you a lot of time. I have created an infographic that includes all the shortcuts they displayed on their own website + the infographic they have already made. (you can check that out by clicking here)
I want to make an infographic that has every shortcut included in it in a beautiful manner (not saying Canva’s own infographic isn’t good but they are missing shortcuts in it). So, tada.. embrace yourself for the wonderful Canva Shortcut Infographic by Anupam Paasan 😎. See below,
#6 Using Text To Image Feature
I saw this feature on many different sites but I did not like that they don’t have any FREE version to try it out before paying and I did not want to pay for their service as I did not even know what it was. Now, that this feature was introduced in Canva, I am amazed by what it does and the best part is that it’s free to use this extension.
Text To Image is amazing when you know what it does. This feature allows you to convert the text you type into a self-generated image which could be realistic, a drawing, a painting, a 3D model, a pattern, concept art, or just a photo. It all depends on what you select in the “choose your style” options tab.
It gives you a field to type in “Describe the image you want to see” and then just choose your style and you are ready to go. See your text come to life by clicking on the “Generate Image” button and be amazed.
Sometimes the generator will create weird-looking art as well (Considering it’s in BETA still). So, you have to keep trying by describing it in more detail and it will eventually come out looking good.
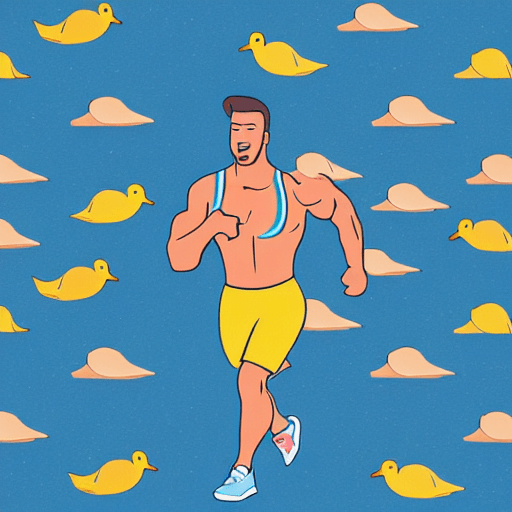
I tried it out and this was the result. I described it as “The muscular guy ran with a duck at the beach” lol.
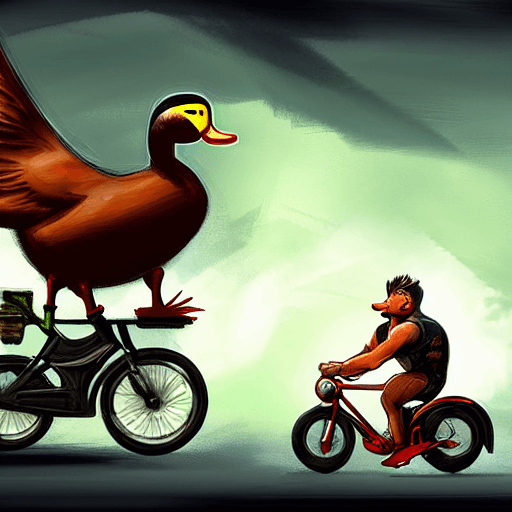
and this result was for “A muscular duck riding a bike with a muscular guy sitting in the back of the bike” oh my god lol.
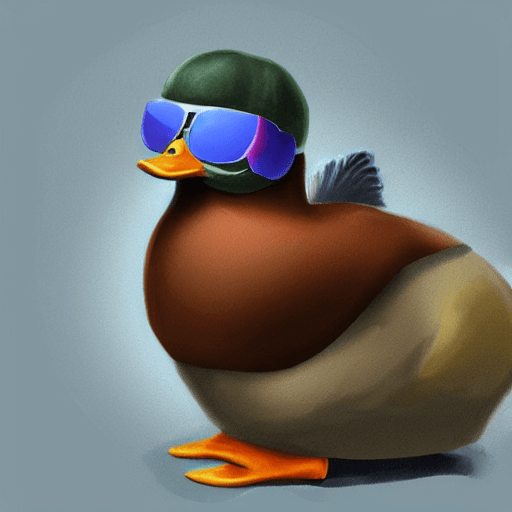
and this result was for “A muscular duck with a coat and sunglasses”. I am happy with this result, it was the best so far out of three. 🙂
of course, you can play around with it and share the results with me on my Twitter page. It will be fun to see what you guys come up with. Enjoy!
#7 Using Smart Mockups To Showcase Your Products
The smart Mockups feature can help you transform any image into customizable product mockups. It’s really useful if you are designing book covers, merch designs, print cards, etc.
Let’s see the steps to make it work.
Step 1: Design your book cover or any image.
Step 2: Click on “Share” then press on 3 dots “More”.
Step 3: Scroll down and select the smart mockups integration then press “Use”.
Step 4: It will take you to “api.smartmockups.com” sign up there and connect.
Step 5: Enjoy playing with your mockups.
#8 Add QR Code To Designs
These days go to any hotel and you will find a QR code on a paper lying around for opening up the food menu or you will find a QR code on any business card. With Canva you can easily create a QR code and put it on your designs so people can scan it and it opens up the link on their devices.
So, let’s see the process of how to add the QR Code to designs.
Step 1: Press the more button on the left sidebar.
Step 2: Select the QR Code integration under Apps & Integrations.
Step 3: Add this QR Code anywhere you like.
#9 Add Comments For Collaboration
This feature helps a lot if you are working with other people on your team or with freelancers. You can add comments on your project created on Canva by clicking on the bubble on the top right side of the canvas section.
When you click on the bubble, add the comment then press the “Comment” button to place the comment or “Cancel” to cancel the comment. You can add teammates to the Canva project or invite them to the project.
#10 Save Designs As Templates To Sell
Created a design on Canva? Good job. Now, you may be wondering how to sell or share those designs that you created on Canva with other people. This is where Templates come in. You can also use your saved Templates to just re-use again on your new projects.
To save a template follow these steps.
Step 1: Make your design in Canva.
Step 2: Select the “Share” button in the top right side corner.
Step 3: Next, select the “Template Link” option.
Step 4: A popup will open, copy the link and start sharing. Enjoy!
#11 How To Add A Link In Canva Bonus Tip
There are multiple ways to add a link in Canva. One of them is using QR Code that we already discussed in Tip #8. Another way to add a link to your project is to add a hyperlink with help of the “Link” button icon. I will explain how to get that done!
Step 1: Make an ebook, document, or website page.
Step 2: Select a text to add a hyperlink to.
Step 3: Next, move your cursor to the corner of the top menu bar of canvas.
Step 4: Click on the link button icon.
Step 5: A popup will open saying “Enter a link or search”.
Step 6: Enter your link in the field and press enter or click on “Done” and Enjoy!
#12 How To Lock, Move & Group Elements In Canva Bonus Tip
Finally, this is the most important one. I know you can drag the element with the mouse but what if you want to move it 1 pixel up or down, lock the element or group them?
To do all of those, I have shared the infographic of all the shortcuts that will help you in Tip #5. You can check it out. But wait I am a good guy and I will tell you step by step how to do it in this part as well. 😉
Moving Elements
To move the design 1 pixel in any direction just use the up, down, left, and right keyboard keys. Yeah, I know that was very simple but what if you want to move them 10 pixels instead of 1 pixel? hehe got you. To move the elements 10 pixels in any direction, use Shift + Arrow Keys (the up, down, left, and right keyboard keys) and that’s it. Let’s move on to the next one.
Lock Elements
To lock the elements in place, it’s very simple as well. You can lock a single item or multiple items on the canvas screen. To do this select an element on your canvas project screen. Go to the top right corner of the menu bar, you will see an unlocked icon. Press it!
The element is now locked, loaded, and secured. 👍
Jokes aside, you will see a lock icon on your locked element when you select them (its position is on the lower right end of the selection). Now, to unlock the item, simply press on the lock icon again and it will be unlocked. Tada!
Now, to do the same thing with multiple elements. Just drag the whole scene and all elements will be selected. Press on the lock icon and all elements are locked, loaded, and secured!
Psst… I learned something new about how to lock the whole page. When you are designing, check the bottom timeline bar. Click on “1” or whichever page you are on. Select the 3 dots button. Then press on “Lock Page” this locks all the elements on that page in one single press or you could use the keyboard shortcut (ALT + SHIFT + L) but this way you can’t single element unlock. You will have to unlock the whole page first but it’s a good tip to know!
Group Elements
To group the elements together. Select multiple elements first by either dragging over the elements or you can hold SHIFT and click on each element one by one. Find the option of “Group” on the top bar when you have selected multiple elements. To ungroup the elements you will have to press the same button.
A shortcut is the easier way. So,
Press Ctrl + G, which will group the elements, and Press Shift + Ctrl + G to ungroup the elements. Tada, Enjoy!
Wrapping Up